

Accessories for the installation and operation of patio heating
, by Warmteshop, 17 min read
, by Warmteshop, 17 min read
The right accessories for patio heating depend on how you want to mount and operate the heater. Dimmers and receivers control the operation, while recessed frames and wall brackets help to position the heater appropriately…
The right accessories for patio heating depend on how you want to mount and operate the heater. Dimmers and receivers control the operation, while recessed frames and wall brackets help to position the heater properly. The connection and design of your patio heater determine which accessories are suitable.
Naturally, you want the heater to work comfortably and blend in neatly with your patio. However, it is not always immediately clear which component you need: a dimmer for the desired heat setting, a receiver for remote control, or a mounting bracket that fits the installation location.
In this article, you will read which accessories play a role in installation and use, what to look out for when combining them with your patio heater, and how to tailor your choice to your specific situation. This will give you a clear overview of the possibilities, from operation to mounting, allowing you to decide with more confidence which components will make your patio more comfortable.
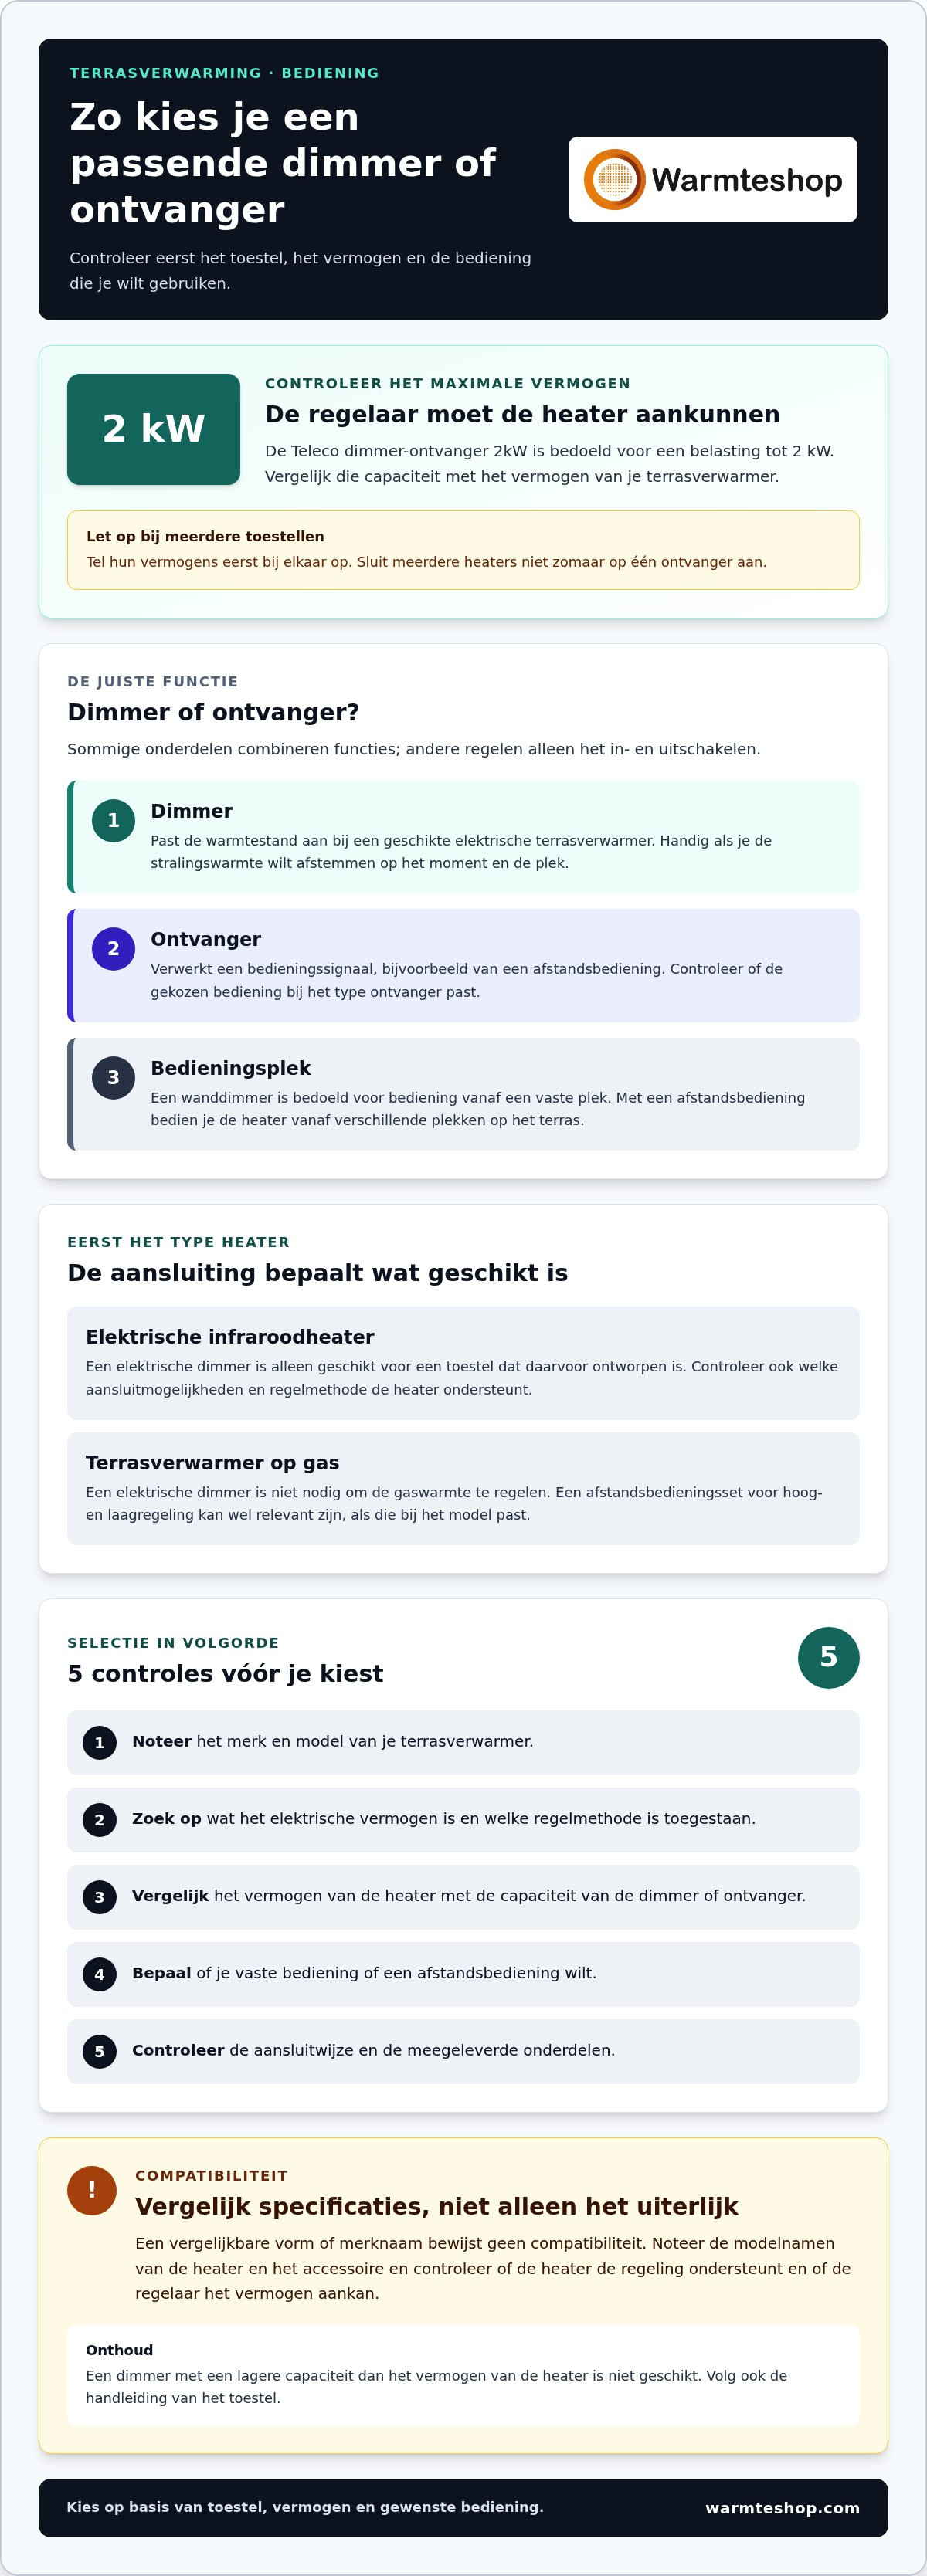
A dimmer adjusts the heat setting of a suitable electric patio heater. This allows you to tailor the radiant heat to the time and location. A receiver processes a control signal, for example from a remote control. Some components combine these functions, while others only control switching on and off. Therefore, first check which controls your heater supports.
Start with the type of heating. An electric infrared heater requires different connection options than a gas patio heater. An electric dimmer is only suitable for a device designed for it. A gas heater does not require an electric dimmer to regulate the gas heat. A remote control set for high and low settings may be relevant, however, if it is compatible with the model.
Next, check the maximum power of the controller. The receiver must be able to handle the electrical load of the connected heater. The Teleco 2kW dimmer receiver, for example, is designed for a load of up to 2 kW. That figure is an important selection criterion: compare it with the power of the heater. Do not simply connect multiple devices to a single receiver. Add their power ratings together first.
Next, choose a component that suits your desired control method. A wall dimmer is convenient if you want to adjust the setting from one fixed spot. With a remote control, you operate the heater from various locations on the terrace. The receiver then acts as the link between the control signal and the heater. Check whether the control unit matches the type of receiver. A similar shape or brand name does not, in itself, prove compatibility.
Use these steps when selecting:
This order prevents unnecessary combinations. A dimmer that can handle less power than the heater is not suitable. Furthermore, a receiver may require specific controls. Therefore, note the model names of both components and compare the product specifications, not just the product photos.
Also consider when you will be using the heater. At a dining table, a lower heat setting may be more pleasant than continuous full power. On an open terrace, a different setting might be desirable. A dimmer allows for such adjustments, provided the heater is compatible. Therefore, choose patio heating accessories based on the unit, power output, and desired controls, not just on appearance.
Align the operation with the device's manual. Keep the model details together so you can properly assess the combination. If you are unsure between two control types, be sure to check whether the patio heater supports that control and whether the component can handle the corresponding power.
A recessed frame integrates a patio heater into a ceiling or canopy. As a result, the heater is less noticeable than with visible mounting. A frame is not universal: the shape and dimensions must match the specific unit. A rectangular heater, for example, requires a different cutout than a round model. Therefore, start with the brand and model of your patio heater.
The frame must not only fit into the opening; the space around the heater also counts. Compare the built-in dimensions with the external dimensions and check how the unit is mounted. A recess that is too small will hinder installation. Conversely, an opening that is too large can result in a visible gap. Use the mounting drawing of the chosen model as a starting point.
Go through these checkpoints before choosing a frame:
The installation location also determines what you need to prepare in advance. The supporting structure of a canopy may differ from that of a fixed ceiling. Therefore, first determine where you can securely attach the frame. The frame can neatly enclose the heater, but it does not replace a suitable supporting structure. Check the surface and follow the manufacturer's installation sequence.
Also pay attention to the heat output and the space around the unit. A built-in frame must not interfere with the operation of the patio heater. Do not place any material in front of openings or parts that must remain clear according to the manual. The required distance varies by model. Therefore, follow the instructions for that specific heater, not those of a similar unit.
Suppose you choose an electric patio heater for a permanent spot under a canopy. First, find the mounting frame that belongs to that model. Then, compare the required cutout with the available ceiling space. Only prepare for installation once both measurements match. This prevents you from ordering a frame that does not fit in the opening.
If you also use the heater in another location, a built-in frame may be less suitable. It is primarily intended for fixed, integrated placement. For a portable setup, a different mounting solution is more appropriate. Make this choice before ordering accessories so that the unit, the frame, and the mounting location are compatible.
When selecting patio heaters for fixed installation, first check which model suits your installation situation. The correct order is clear: choose the heater, compare the frame specifications, and then prepare the cutout. This makes the installation neater, without leaving the fit to chance.
When finalizing your selection, please also take the schedule into account: for orders placed before 5:00 PM, the store promises next-day delivery.
A wall bracket attaches a patio heater to the wall. The correct bracket depends on the brand, model, and mounting type. A bracket for one heater does not automatically fit another unit. Therefore, compare the mounting points of both components. Also, check if you can direct the heat in the desired direction with the bracket.
Next, consider the location where you want to mount the heater. A brick exterior wall requires a different mounting method than wooden cladding. The surface must be able to support the weight of the heater and bracket. Do not attach the bracket solely to a thin finishing layer. Determine the location of the load-bearing elements and match the fasteners accordingly.
Pay attention to these points when making your choice:
Adjustability makes a difference in daily use. With a fixed bracket, the heater remains positioned in one direction. An adjustable version can direct the heat towards a seating area. Consider, for example, a patio with a table along the wall. Check how much movement the bracket allows and whether you can direct the heat towards the seating area.
Plan the installation before drilling holes. Keep the patio heater manual at hand. Mark the position of the bracket and compare it with the cable route. This prevents a connection from ending up behind the mounting. Also check the prescribed clearance around the unit. This varies by model.
For a wooden wall, check where the sturdy supporting structure runs. For masonry, pay attention to the condition of the bricks and joints. The mounting must match the substrate, not just the appearance of the facade. Choose fasteners that are suitable for the material. Follow the mounting instructions for both the heater and the bracket.
Suppose you are installing a heater against the facade above a seating area. First, determine the location of the table and the direction in which you require heat. Next, check if the bracket fits the model. Then, align the mounting position with the manual. This prevents the bracket from fitting, but the heat from being directed in the wrong direction.
A wall bracket is particularly suitable for a fixed position on the facade. If you want to move the heater later, a fixed mounting limits that flexibility. Determine what you need in advance. Therefore, when choosing accessories for patio heating, do not compare only the shape of the bracket. Also pay attention to model compatibility, wall material, adjustability, and the desired heated zone.
Which accessories are essential depends on the type of patio heater. For mounting, you need a suitable wall bracket, ceiling mount, or recessed frame. For operation, a dimmer or receiver can be useful. A gas heater requires accessories for the gas connection. Therefore, start with the model and the energy source.
With electric heating, the choice revolves around mounting and control. A wall bracket attaches the unit to the wall. A recessed frame is intended for integrated mounting. A dimmer is only suitable for a heater that supports adjustable heat settings. A receiver is relevant if you want to control the heater remotely. Always check the specifications of both the heater and the accessory.
For a propane gas patio heater, a suitable connection kit may be required. The PH8 connection kit, for example, is designed for propane gas. A remote control set for high and low levels can support the operation of a suitable gas heater. The set must match the model and the control method. Electric dimmers and gas control sets therefore fulfill different functions.
Make a brief inventory before purchasing:
The difference becomes clear with an example. For a facade electric heater, you first look for a suitable wall bracket. If you also want to adjust the heat setting, check whether the unit is dimmable. With a gas heater, on the other hand, you start with the correct gas connection. A remote control set is only relevant if the controls are compatible with the unit.
A protective cover can be useful if you want to cover the heater after use. Choose a cover that matches the shape and design of the unit. A cover does not replace a mounting part and does not operate the heater. Keep these functions separate when choosing accessories.
Do not automatically buy every accessory offered for patio heating. For a fixed wall installation, you do not need a floor stand. A unit without adjustable settings has no use for a dimmer that assumes such settings. What is useful depends on your usage: fixed mounting, flexible placement, customized control, or protection when the heater is not in use.
Follow this sequence: identify the heater, determine the mounting location, and then choose the controls or protection. This prevents an accessory from having to perform a function that your appliance does not support. Compare the model details and the intended setup before making a choice.
Cost can be a factor, but start with the connection and controls your heater supports. Only compare prices after you have determined which accessory fits the model. A lower price is of no help if the set does not work with the heater.
Check the product specifications and determine whether you need an accessory for the gas connection or remote control. A part that does not fit the connection or control method will not solve anything during installation or use. Also check which parts are already included with the appliance so that you do not purchase anything unnecessarily. This ensures your choice remains focused on what the installation requires and how you want to operate the heating.
Start with the rating plate of your patio heater. Note down the brand, model, and wattage exactly. With this information, you will find the correct product details. An accessory that looks the same does not automatically fit. Therefore, compare the model designation with the specifications of the part. Use the heater's manual as a starting point, not just a product photo.
Next, check which type of connection you need. An electric heater requires an accessory for electrical operation or mounting. A gas heater uses components for the corresponding gas connection and control. A dimmer is only suitable if the heater is dimmable. A receiver must match both the appliance and the desired control.
For a dimmer or receiver, the power rating is an important point of comparison. Take the value of the device and compare it with the capacity of the controller. The Teleco 2kW dimmer-receiver, for example, has a power rating of 2 kW. Use this designation as a selection criterion, not as proof that every heater will work with it. Also check the connection method and the permitted application.
For a wall bracket or recessed frame, check different specifications. Compare the mounting points, dimensions, and intended placement with those of the heater. A frame for ceiling mounting is not automatically suitable for a wall. For a protective cover, check the shape and design of the unit. Each accessory has its own fit specifications.
Follow these steps before ordering:
Take an electric heater that you want to control with a dimmer. First, find out if the model supports control. Then, compare the power and connections with those of the dimmer. With a gas heater, you start with the type of gas control. This prevents you from choosing an electrical control component for a function the appliance does not use.
Also pay attention to phrases such as “suitable for” in the product information. Look for the exact model or an explicitly mentioned product range. A general description like “for patio heaters” provides less guidance than a specific model designation. Keep the manual and product details together so that you can easily repeat the comparison later.
Do you want to compare the available parts side by side? View the patio heating accessories and compare the specifications with your model details.
Warmteshop helps you choose infrared heating that suits your living or outdoor space. If you are comparing heating solutions in addition to operation or installation, start with the intended use and the desired location. An infrared mirror, for example, combines heat with a mirror; infrared glass heating is suitable for a different application. This way, you first look at what the space needs and then at the accessories.
With the right product data, you can specifically determine which solution suits your situation. At Warmteshop, you will find various forms of infrared heating and can explore the possibilities. Would you like to discuss your choice or view the options? Contact Warmteshop or visit warmteshop.com.
As the next step, determine how you want to use the patio. Consider where you sit, how you want to regulate the heat, and whether you want to change the layout later. This way, you choose accessories that not only match the heater but also your daily routine. The right accessories for patio heating are part of a well-thought-out setup, not a loose collection of parts.
Would you also like to tailor your heating choice for your home? Warmteshop offers infrared heating, infrared panels, and infrared mirrors, among other things. This allows you to view various heating applications and determine what suits your living comfort. Always keep the intended use and product specifications in mind when making your choice.
View the accessories for patio heating and take a suitable next step towards a more comfortable patio.
Commonly used accessories include controls, mounting parts, and protective covers. Think of a remote control for a suitable heater, a wall bracket for fixed installation, or a cover to protect the unit. For a gas heater, a suitable connection kit may be relevant. Choose accessories based on function: a cover does not alter the mounting, and a control element does not replace a fastener. This way, you assemble a set that suits your needs.
The right bracket or stand depends on the model and the desired placement. A wall bracket is suitable for mounting to the wall; a floor stand offers a freestanding setup. Compare the mounting points and product specifications with those of the heater. For a terrace with multiple seating areas, a movable stand can be practical. For a fixed position along the facade, a wall bracket is the more logical choice.
For electric patio heaters, there are various accessories available, including dimmers, receivers, and remote controls. A thermostat or wireless control is only usable if the heater supports that type of control. The Teleco 2kW dimmer receiver is a concrete example of a control component. Compare the power rating, connection type, and operating method with the specifications of your device. This will prevent you from choosing a control system that is not compatible with the heater.
Always follow the manual for the specific device during installation and use. Maintain the indicated clearance and use accessories for their intended purpose. For example, do not place a cover over a heater that is still warm. For electrical components, pay attention to the connection method and the permitted power. Do not use damaged cables or parts, and follow the manufacturer's instructions during assembly.
At Warmteshop, you can view accessories for patio heating. Compare the product details with the brand and model of your heater, especially for controls and mounting parts. For example, a cover must match the model, while a dimmer must align with the electrical specifications of the unit. With this information, you can make a more targeted choice from accessories for mounting, operation, or protection.


