
Installing infrared heating yourself: The complete guide for 2026
, by Warmteshop, 22 min read
, by Warmteshop, 22 min read
You save an average of 450 euros in installation costs this year simply by taking control of your switch to sustainable radiant heat yourself. Although installing infrared heating yourself sounds like a comple… to many
You will save an average of 450 euros in installation costs this year simply by taking control of your switch to sustainable radiant heat yourself. Although installing infrared heating yourself sounds like a complex technical challenge to many, with the right preparation it is a surprisingly accessible project. You likely recognize the desire to upgrade your home to the healthy comfort of the sun, but at the same time feel a healthy caution. Perhaps you are wondering whether your plasterboard walls can support the panels or how to effectively prevent overloading your 16-amp circuits.
You are right that a secure technical foundation is essential for a worry-free warm home. In this complete guide for 2026, you will learn how to safely and efficiently install your own infrared panels step-by-step for maximum efficiency and an immediately lower energy bill. We eliminate all uncertainty by delving deep into ideal positioning for the best radiation angle, the right mounting materials for every wall, and correctly connecting your thermostat control. This way, you will soon enjoy not only a perfectly functioning system but also genuine pride in a successful DIY project.
Choosing to install infrared heating yourself is a decision that directly impacts both your living comfort and your wallet. With a DIY installation, you mount the panels independently to the wall or ceiling and connect them to the power grid. This can be done via a simple plug-and-play solution using a plug or by means of fixed wiring for a sleek finish. The biggest advantage is speed; you are not dependent on the overcrowded schedules of installers, who in 2024 often have waiting times of twelve weeks or longer. Additionally, you save an average of €150 to €300 in installation costs per room.
Unlike a traditional central heating system, infrared heating requires no extensive demolition work. Whereas radiators require running pipes through floors and walls, infrared panels only require a 230-volt mains connection. This makes the system ideally suited for renovation projects or for making specific rooms, such as a home office or bathroom, more sustainable. You do not need to be a plumber to install a panel. If you can handle a drill and read a spirit level, you have enough manual dexterity for this job.
Infrared panels work on a principle we all know: the natural heat of the sun. Instead of heating and moving the air, which often causes dust circulation, these panels emit direct radiation that heats objects and people in the room. For a deeper insight into the technical operation of infrared heaters, you can consult scientific sources that explain the difference between near- and far-infrared.
The system you are bringing into your home is built from three essential components:
The 230V connection is the ideal starting point for any DIYer. You simply connect the panel to an existing socket or junction box. This makes the system modular; you can do one room today and the rest of the house next year.
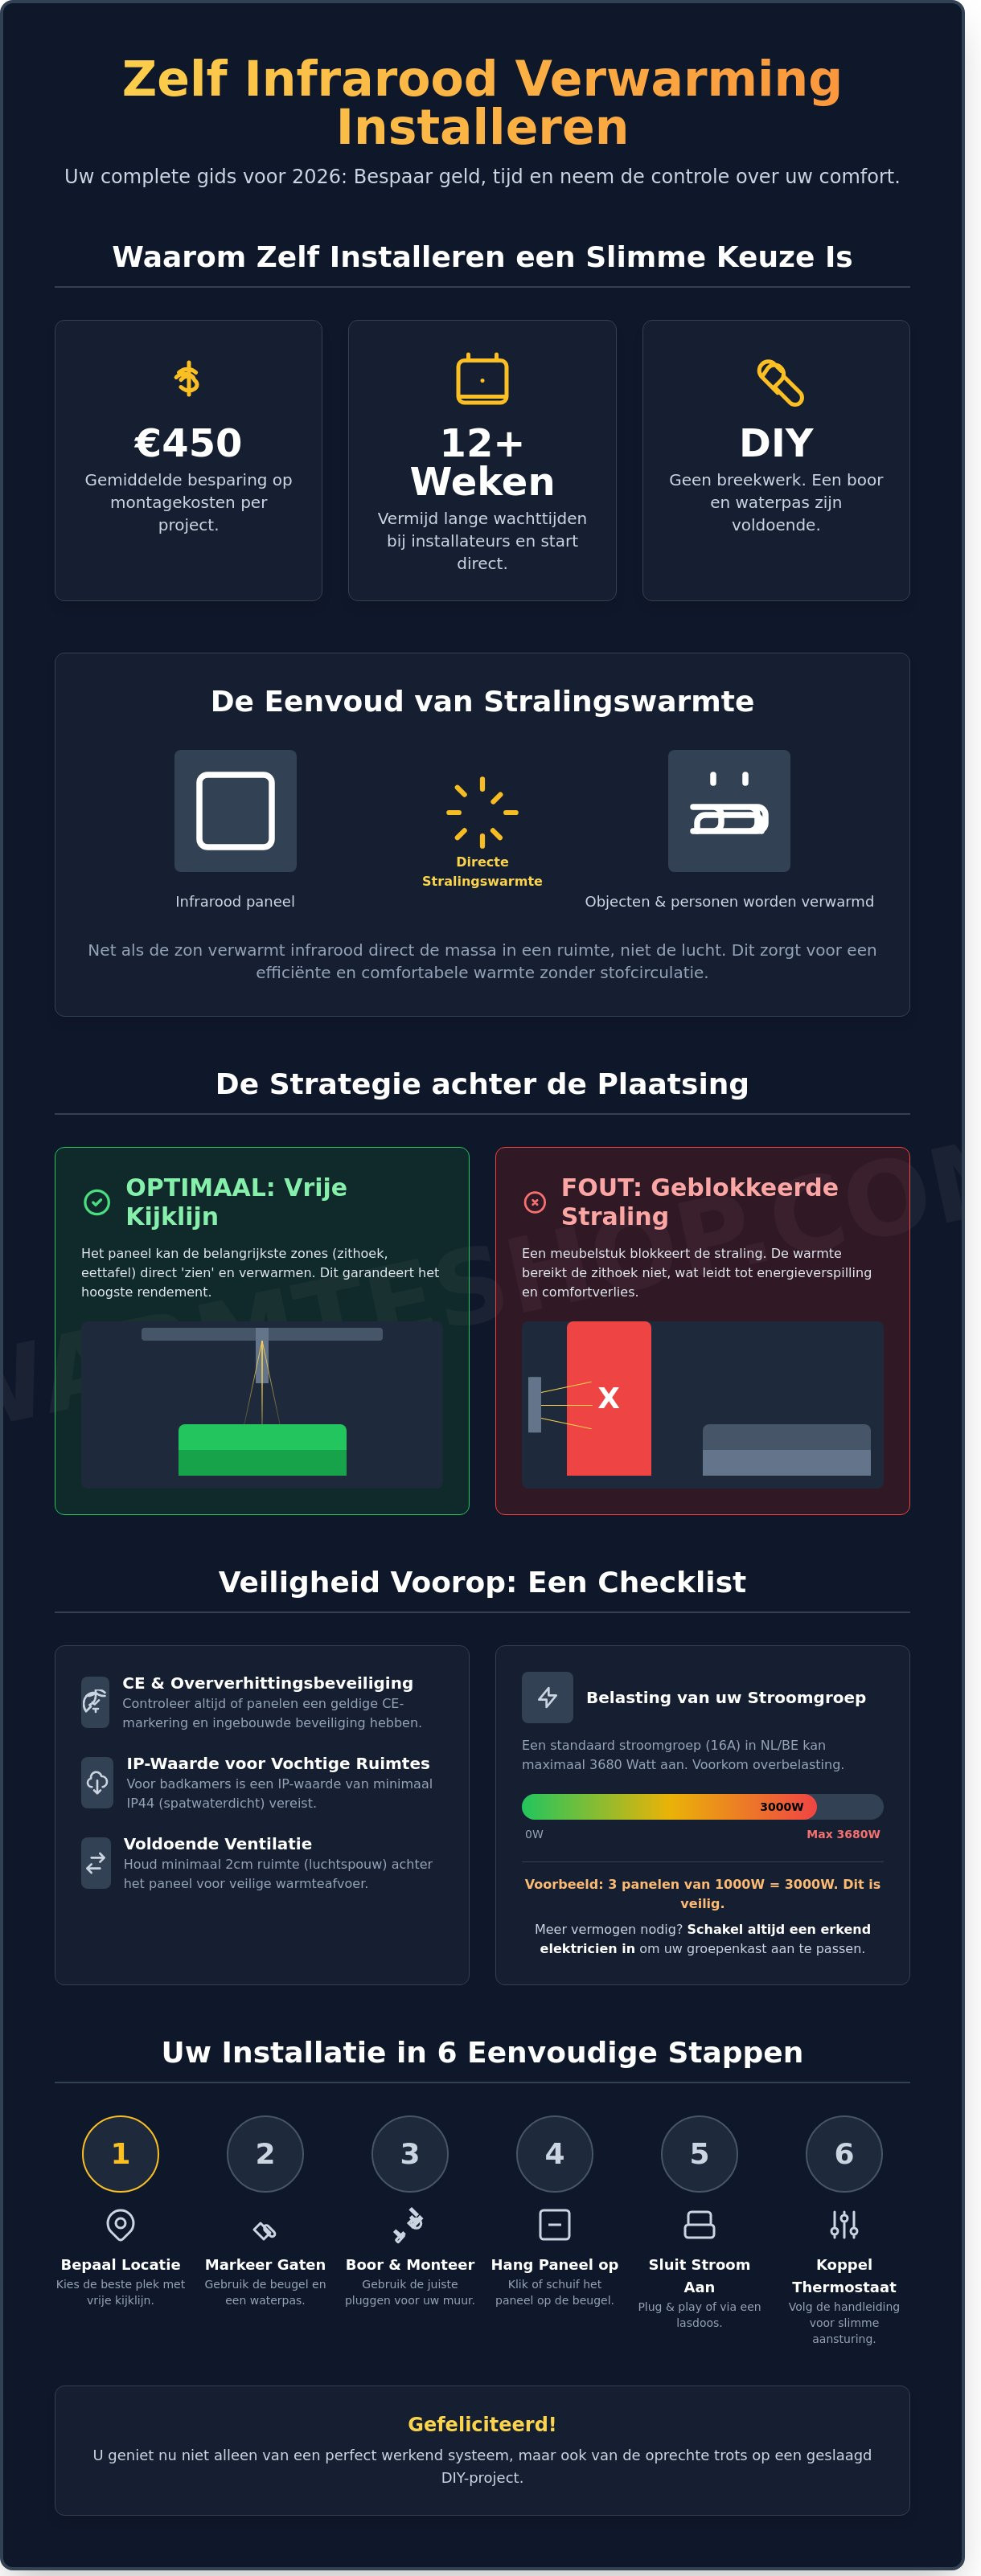
Safety comes first when installing infrared heating yourself. Always check that your panels have a valid CE marking and an IP rating suitable for the room. For the bathroom, a minimum IP44 rating is required to guarantee protection against splashing water. Since the stricter guidelines of 2023, it is also crucial to check for overheating protection, a standard feature in all high-quality systems.
There are times when you *must* call in a certified electrician. For example, if you want to connect more than three 1000-watt panels to a single circuit, you run the risk of overloading. A standard circuit in the Netherlands and Belgium can handle a maximum of 3680 watts. Does the fuse box need to be expanded with an extra fuse? Then always leave this to a professional. With high-power panels, fire safety is not a matter of debate; ensure correct installation so that heat can always escape from the rear via the prescribed air gap of at least 2 centimeters.
Infrared heating does not heat the air, but rather the objects and people in a room. This principle is comparable to the radiant heat of the sun on a clear winter day. As soon as you stand in the sun, you feel the warmth immediately, regardless of the air temperature. Therefore, when installing infrared heating yourself, the location of your panels is the most critical factor for success. A panel that is incorrectly oriented wastes energy and does not provide the desired comfort.
The effectiveness of a panel depends entirely on the so-called line of sight. Infrared radiation travels in straight lines. Everything the panel can literally 'see' is heated. If you place a panel behind a sofa or an open door, you block the radiation and create a cold shadow. For optimal results, the panel must have a clear view of the places where you spend the most time. Think of the seating area, the dining table, or your workspace.
A common mistake is placing panels directly opposite windows. Glass has the property of barely reflecting or absorbing infrared radiation. As a result, a significant portion of precious heat escapes to the outside. It is better to direct your panels towards interior walls or a stone floor. These materials have a high thermal mass and act as a natural heat battery. They store the radiation and release it very evenly into the environment throughout the day. This ensures a stable indoor climate without the annoying air circulation often experienced with traditional radiators.
Ceiling mounting is the most efficient choice in 85% of cases. The radiation reaches the floor unimpeded, allowing it to warm up to a comfortable 18 to 20 degrees Celsius. This creates an effect that closely resembles underfloor heating. When mounting on the ceiling, take into account the radiation cone of approximately 45 degrees. Wall mounting, on the other hand, is excellent for supplementary heating in specific zones. Preferably hang a wall panel at a height between 1.50 and 1.70 meters for an immediate sensation of warmth at sitting height.
Obstacles are the biggest enemy of high efficiency. Furniture standing in the way absorbs heat before it reaches you. In addition, safety is essential during installation. Always follow the official installation safety guidelines to prevent overheating. Maintain a minimum distance of 20 centimeters from flammable materials such as curtains or wooden cabinets. By choosing smart zone heating, you only heat the 5 to 8 square meters where you are actually present. This immediately saves on your monthly energy costs. Do you want to know exactly what power you need for your specific room? Then check out our advice page on capacity calculation for a tailored result.
When installing infrared heating yourself, it is all about angle and distance. A panel hanging from the ceiling at a height of 2.5 meters covers a larger surface area than a panel on the wall. By strategically distributing the panels throughout the room, you prevent cold corners and maximize heat absorption by the walls. This is the key to a future-proof and carbon-neutral home that is not only sustainable but also feels incredibly comfortable.
A successful transition to sustainable radiant heating begins with meticulous preparation. The process of installing infrared heating yourself is perfectly feasible for the average do-it-yourselfer, provided the basic technical prerequisites are in order. By doing so, you not only create a healthier indoor climate but also immediately increase the value of your home through more efficient energy management.
To ensure a smooth installation, you will need a specific set of tools. A powerful hammer drill is essential for brick or concrete walls, while a high-quality cordless drill suffices for drywall. Always use a digital spirit level to guarantee that the panel hangs perfectly straight; with a 120-centimeter panel, a deviation of just 2 millimeters is immediately noticeable. Additionally, wire strippers, a voltage tester, and a tape measure of at least 5 meters are indispensable in your toolbox.
The choice of the right fastening materials determines long-term safety. Standard plugs, often included in universal sets, are rarely sufficient for heavy glass panels of 15 kilograms or more. For solid concrete, choose expansion plugs made of high-quality nylon. For hollow plasterboard walls, special umbrella plugs or metal hollow wall plugs are necessary to distribute the weight over a larger surface area.
Perform an accurate power calculation before purchasing. For a well-insulated room, calculate with an average of 25 to 30 Watts per cubic meter. A 60 m³ living room therefore requires a total power of at least 1,500 to 1,800 Watts for optimal comfort. Also check your fuse box. A standard 16-amp circuit can handle a maximum of 3,680 Watts. If you connect multiple panels to a single circuit, you must prevent the total load from exceeding this limit to avoid overloading.
Quality is central to the selection of your components. It is crucial to select the right infrared heater that matches the specific thermal properties of your space. For a fixed connection, the use of heat-resistant cabling, such as silicone cable, is recommended if the wiring runs directly behind the panel. This prevents the insulation from drying out over time due to the constant heat output of the panel.
A well-thought-out installation plan prevents unnecessary holes in your walls. Use the included drilling templates to mark the exact positions of the mounting brackets. When determining the location, take the thermostat into account; place it at a height of approximately 150 centimeters and never in direct sunlight or in the radiation beam of the panel itself. Always use a pipe locator to check for hidden electrical cables or water pipes before drilling into the wall. Installing infrared heating yourself requires precision to utilize the optimal distribution of radiant heat, comparable to the natural warmth of the sun.
When you decide to install your infrared heating yourself, a structured approach is half the battle. The installation process is similar to hanging a heavy painting or a flat-screen TV, but requires just that little bit of extra attention to technology and safety. Follow these five steps for a rock-solid result.
Step 1: Marking the drill holes. Use the included 1:1 drilling template that Warmteshop supplies with most panels. Tape this to the desired location on the wall or ceiling using painter's tape. Always use a spirit level; a deviation of just 2 millimeters is immediately noticeable on a 120-centimeter panel.
Step 2: Drilling and anchoring. Drill the holes at the marked points. For a standard brick wall, a 6mm or 8mm drill bit is sufficient. Use high-quality plugs suitable for your wall type. For plasterboard walls, special hollow wall plugs are essential, as an average panel weighs between 5 and 22 kilograms.
Step 3: Attaching the mounting bracket. Screw the brackets firmly in place. After tightening, check that there is no play in the bracket. A panel that vibrates due to a loose screw can eventually cause annoying resonant noise.
Step 4: Hanging the panel in the bracket. Carefully lift the panel and slide it into the recesses of the bracket. For panels larger than 60x60 centimeters, always do this with two people to prevent damage to the coating or your back. You will often hear a distinct click or feel the panel lock into place.
Step 5: The test run. Plug the device into the socket or switch on the circuit breaker. Within 5 to 10 minutes, you should feel the characteristic radiant heat reminiscent of the first spring sun on your skin.
Most DIYers opt for the plug-and-play method. This is the fastest way to enjoy heat immediately. You simply plug the connector into an existing grounded socket. However, for an aesthetic result, a permanent connection is superior. In this case, you cut off the plug and connect the wires directly to a flush-mounted box behind the panel. This makes the wiring completely invisible.
Do you want to control the temperature accurately? Then install a surface-mounted or flush-mounted receiver between the panel and the power supply. This receiver communicates wirelessly with your thermostat. As a result, the system only switches on when the room drops below the set temperature, which reduces your energy consumption by an average of 20%.
Stricter regulations apply in the bathroom due to the combination of electricity and moisture. Always take the statutory safety zones into account. Never place a panel directly above the shower or bath (zone 1). The ideal location is zone 3, at least 60 centimeters away from the water source. When purchasing, pay attention to the IP rating; an IP44 classification is splash-proof and is therefore the standard for bathrooms.
A popular choice is the installation of an infrared mirror. This not only provides pleasant warmth but also prevents the mirror from fogging up after a hot shower. For extra comfort, you can opt for an infrared towel dryer. When installing this, it is important that the brackets hang exactly level so that the towels dry evenly and the device makes optimal use of its full power of, for example, 500 Watts.
Are you ready to make your home more sustainable with the latest heating technology? View our full range in the webshop and start saving today.
The installation of your infrared panels is complete. Now begins the phase in which you maximize comfort and minimize your energy bill. An infrared panel works fundamentally differently from a traditional radiator. Whereas a central heating boiler heats the air, these panels radiate heat directly to objects and people, comparable to the beneficial rays of the sun on a crisp spring day. To make optimal use of this process, well-thought-out control is indispensable. Without the proper regulation, a panel simply remains 'on', which can reduce efficiency by as much as 20 to 30 percent.
Setting time programs is your most powerful tool in this regard. Infrared heat is felt almost immediately, meaning you do not need to start heating hours in advance. Program your system to switch on only 10 to 15 minutes before your arrival. Do you follow a fixed schedule? Then set a specific schedule for each room. After all, the bathroom only needs to be comfortable between 07:00 and 08:00, while the home office only requires heat from 09:00 onwards. This zone control prevents you from heating empty rooms, which directly results in a lower carbon footprint.
Modern Wi-Fi modules take this ease of use to a higher level. Via intuitive apps on your smartphone, you can control the panels from the couch or even while on the go. Are you coming home later than usual? Then you can switch off the heating with the touch of a button. These systems often also provide immediate insight into your consumption figures, allowing you to adjust your heating behavior based on facts rather than assumptions. Fortunately, maintenance of the panels is extremely simple. Because no moving parts or liquids are involved, it is sufficient to wipe the panels twice a year with a dry, soft cloth to prevent dust accumulation. This guarantees unobstructed radiation and a lifespan that often exceeds 25 years.
This stands in contrast to many other household appliances, where maintenance or repair is sometimes more complex and requires specific parts. For do-it-yourselfers who also want to maintain their white goods, such as washing machines or refrigerators, themselves, finding the right spare parts is essential. A good source for this is, for example, Hvidevaredele.dk.
When you decide to install your infrared heating yourself, configuring the thermostat is the final, crucial step. You have the choice between wireless RF thermostats, which are ideal for renovations without any drilling or breaking work, and Wi-Fi solutions for full integration into your smart home. Pay close attention to placement: never hang the thermostat directly in the panel's radiation beam. This affects the measurement, causing the system to switch off prematurely. The best location is an interior wall at a height of approximately 1.5 meters, out of reach of drafts or direct sunlight. Are you connecting the system to Google Home or Alexa? Then you can even control the temperature with voice commands for ultimate living comfort.
Although installing infrared heating yourself is manageable for most DIY enthusiasts, complex projects require a different approach. When transitioning a home to gas-free heating or when furnishing large industrial halls, factors such as heat loss calculations and grid load come into play. In such cases, Warmteshop's expertise offers a solution. We perform detailed calculations based on your insulation values and room volume, ensuring you install exactly the right wattage per square meter. For personal advice and a demonstration of the various design options, you are always welcome at one of our 30 showrooms spread across the region. Here, you can experience the quality of our systems firsthand before taking the final step towards a sustainable future.
You now have all the tools to enrich your home with warmth that feels like a sunny spring day. The success of your project depends on smart positioning and the right preparation, as described in this guide. Installing infrared heating yourself is the most efficient route to a carbon-neutral home without the need for major renovations. With proper installation and smart thermostat control, you create a healthy indoor climate that responds precisely to your daily needs.
Warmteshop has served as your expert guide in this energy transition for over 15 years. As a market leader in energy-efficient heating solutions, we offer not only high-quality products but also the assurance of technology tested for years. For specific tailored advice or a demonstration of our latest design panels, advisors in our 30+ physical showrooms in the Benelux are ready to assist you. We combine technical superiority with an accessible approach so that you can start your installation with complete confidence.
View our range and start your DIY project today!
Start upgrading your living comfort today. The transition to green energy and a lower energy bill has never been so simple and tangible.
Yes, you can safely mount an infrared panel on a plasterboard ceiling if you use the correct hollow wall anchors or umbrella anchors. A standard 12.5-millimeter thick plasterboard has a load capacity of approximately 15 kilograms per mounting point. Since most panels weigh between 5 and 12 kilograms, this is technically not a problem at all.
Make sure to screw the brackets directly into the underlying wooden battens for maximum stability of 30 kilograms or more. This provides extra security with larger panels. Proper anchoring prevents vibrations and guarantees safe, long-lasting operation of your system.
You may connect a maximum of 3000 Watts of infrared panels to a single standard 16-amp circuit. Although the theoretical limit is 3680 Watts, we apply a safety margin of 20 percent to prevent overloading. In practice, this means that you can combine approximately five 600-Watt panels on one circuit without any problems.
Are you going to install the infrared heating yourself in a larger room? Then always check whether the relevant circuit is not already heavily loaded by other appliances such as a kettle or vacuum cleaner. By distributing the load smartly, your electrical circuit remains stable and operates efficiently.
The back of a high-quality infrared panel does not get dangerously hot and usually reaches a temperature between 35 and 45 degrees Celsius. Thanks to the high-quality insulation on the inside, 95 percent of the heat radiates forward into the room. As a result, you run no risk whatsoever of scorching or discoloration of your wallpaper or paintwork.
This limited heat output at the rear ensures that you can securely mount the panel on virtually any wall construction. Furthermore, the built-in spacers create a natural airflow. This prevents heat buildup and fully protects the integrity of your wall finish.
Always use the supplied mounting kit or choose stainless steel screws with a minimum diameter of 4 millimeters for a secure anchoring. When mounting in concrete, 6 or 8 millimeter plugs are essential to support a weight of 8 kilograms or more. In damp areas such as the bathroom, we specifically recommend corrosion-resistant screws.
Proper preparation with the right materials guarantees that your panel will hang flush against the wall for decades. Cheap screws may develop play over time due to the slight thermal expansion of the panel. Therefore, invest in quality materials for a professional and safe result.
Shortening the factory cable results in the immediate invalidation of the 2 to 5-year manufacturer's warranty on the electrical components by most manufacturers. The plug and cable are tested as a single unit for CE certification. Modifications to these parts can affect the electrical safety of the product.
Would you prefer to conceal the wiring? Then choose to place a junction box behind the panel where you can coil up the excess cable. This way, you retain full technical support and the fire safety of the system remains 100 percent guaranteed without damaging the original components.
Maintain a minimum distance of 150 centimeters between the infrared panel and the thermostat to prevent false temperature readings. Otherwise, because the thermostat immediately captures the radiant heat, the system switches off too early while the rest of the room is still cool. Preferably, place the sensor on an interior wall at a height of 1.5 meters.
Thanks to this strategic positioning, you enjoy a constant climate comparable to the even warmth of the sun. A thermostat positioned out of the direct radiation zone measures the actual ambient temperature more accurately. This results in lower energy consumption and higher living comfort.
It is certainly possible to install infrared underfloor heating yourself, provided you choose dry-construction systems such as infrared foil under laminate or parquet. This wafer-thin foil, only 0.3 millimeters thick, is easily laid on an insulating subfloor. It is a quick way to integrate healthy warmth into your home.
Do you want to install the complete infrared heating in the floor yourself? Then ensure that the electrical connections are wired in parallel in accordance with the applicable NEN 1010 standards. For connecting to the meter box, we always recommend engaging a certified electrician for the final inspection.


