
Installing a Patio Heater: The Complete Guide for 2026
, by Warmteshop, 16 min read
, by Warmteshop, 16 min read
Just imagine those lovely, long evenings on your patio, comfortably extended thanks to the pleasant radiant heat of your new patio heater, perhaps with the aroma of a barbecue or the taste of authentic..
Just imagine: those wonderful, long evenings on your terrace, comfortably extended thanks to the pleasant radiant heat of your new patio heater, perhaps accompanied by the scent of a barbecue or the taste of authentic Spanish charcuterie. For a complete barbecue experience, you can check out Tools & Grill, while for Spanish delicacies, Jambons Oliveras is highly recommended. This atmosphere of comfort might make you dream of a holiday; for a luxury getaway, for instance, you can rent a Chalet Bayerischer Wald. But before you can enjoy that comfort at home, that one important question regarding the heat arises: how do you handle the installation? Uncertainty about the correct mounting height, fear of electrical problems, or the question of whether your circuit can handle it can dampen enthusiasm. Installing a patio heater raises questions that deserve a careful answer, because safety and efficiency come first.
That's exactly why we've compiled this comprehensive guide for 2026. We'll guide you step by step, from choosing the perfect, strategic location to the details of a safe electrical connection. After reading this article, you'll have the knowledge to confidently carry out the installation yourself or make a well-informed decision about hiring a professional. This way, you'll create a safe and optimally performing heat source, ready to embrace you and your guests with healthy, comfortable warmth.
A comfortable and warm patio is an extension of your home. installing a patio heater begins long before you pick up the drill. A well-thought-out plan is the key to a safe, efficient, and sustainable installation. By making the right choices beforehand, you will soon enjoy pleasant, healthy warmth worry-free, exactly where and when you want it.
The first step is to determine the ideal mounting location. Depending on your space and preferences, you can choose wall-mounted, ceiling-mounted, or a freestanding model. There are various types of patio heaters, each with its own installation process. For outdoor use, the IP rating (Ingress Protection) is crucial. This rating indicates how well the device is protected against moisture and dust. For an uncovered patio, we recommend an IP rating of at least IPX4 to ensure safety. Finally, always check the contents of the box immediately after purchase: are the manual, brackets, and screws complete?
Our electric patio heaters use infrared technology, which delivers direct radiant heat. Unlike traditional heating that heats the air, you feel the heat directly on your skin, similar to the sun. This is not only more efficient but also more pleasant. Depending on whether your patio is open (short wave), partially sheltered (medium wave), or fully enclosed (long wave), you choose the right technology. Discover the various electric patio heaters in our range to find the perfect match for your outdoor space.
Good preparation also includes having the right tools ready. This will prevent interruptions and allow you to install your patio heater safely. Make sure you have the following on hand:
A successful and safe installation begins long before you even start drilling. Choosing the right location is crucial for both your heat experience and overall safety. Careful positioning ensures you maximize the benefits of healthy infrared radiation, right where you prefer to relax. Before installing your patio heater , it's essential to carefully consider the following factors.
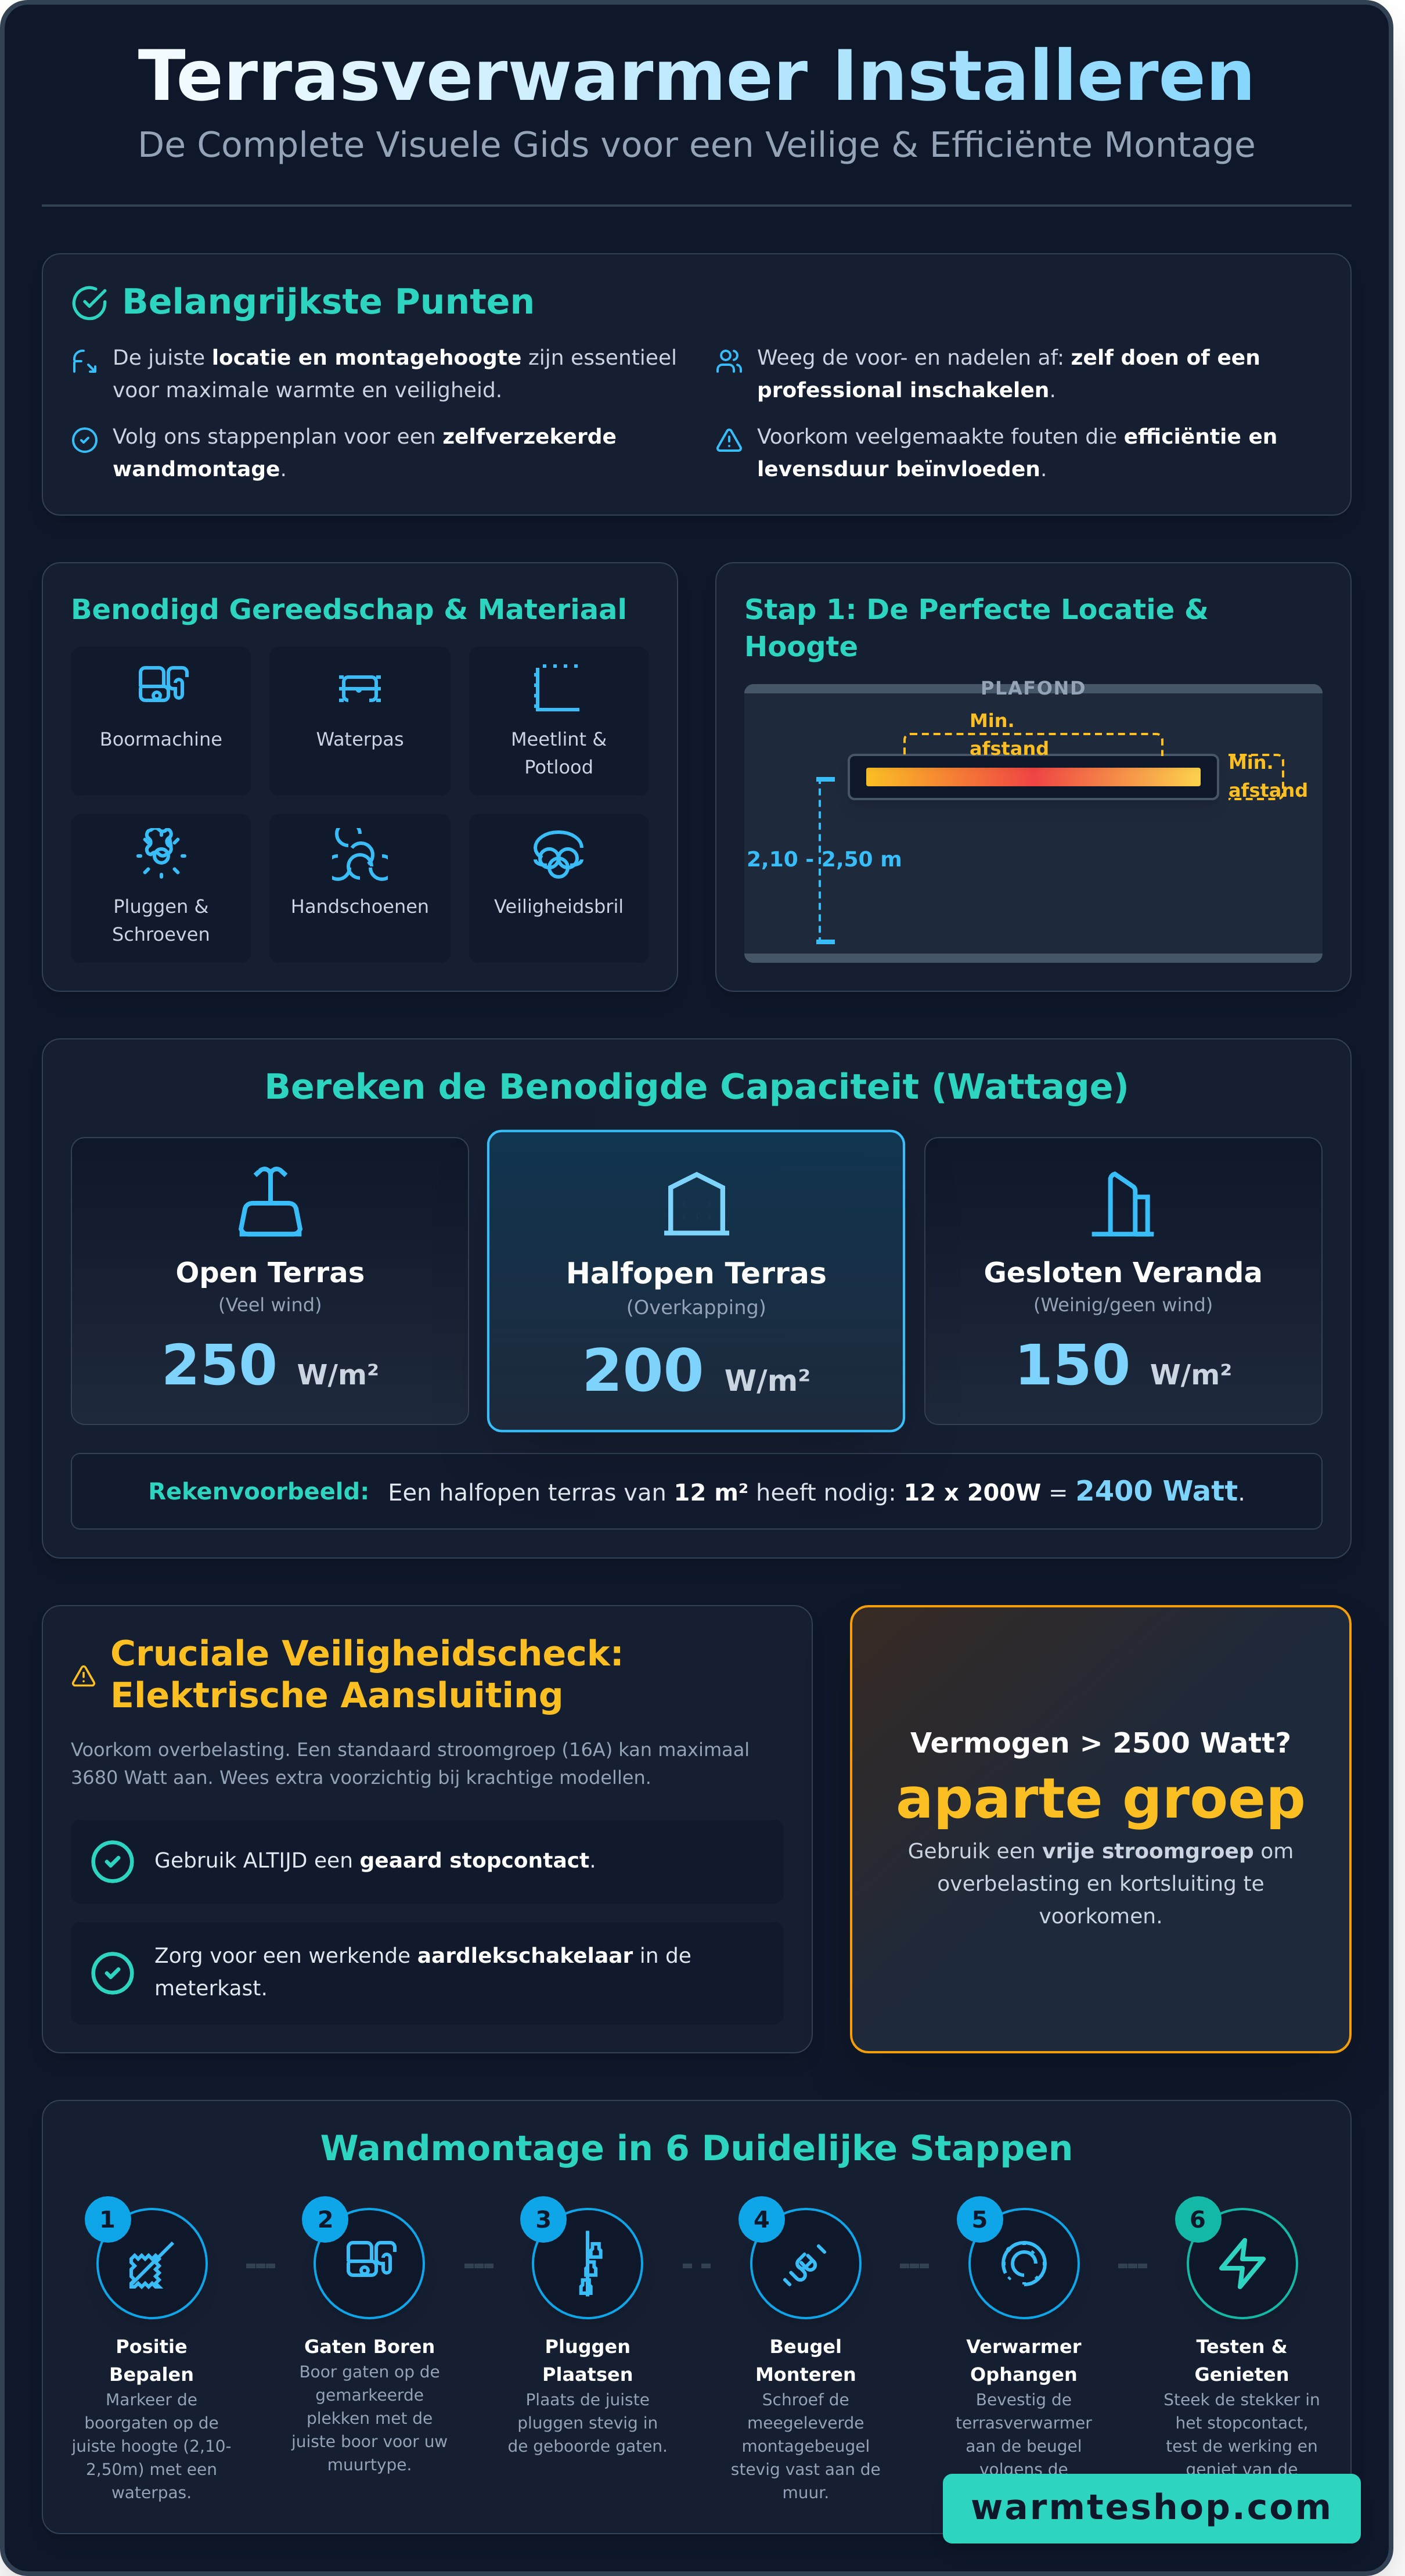
The mounting height has a direct impact on efficiency. Most infrared patio heaters perform optimally at a height between 2.10 and 2.50 meters. Even more important are the minimum distances to other objects. Always observe the distance prescribed by the manufacturer to ceilings, walls, and especially flammable materials such as awnings or wooden beams. Incorrect installation is a common risk, as evidenced by a safety warning from the VWA, which emphasizes the importance of following the manual closely. Analyze your patio: where do you sit the most? Aim the heater at that spot for maximum comfort. Furthermore, a sheltered location reduces the impact of wind and significantly increases efficiency.
Not every patio heater is suitable for every situation. The required power (expressed in watts) depends heavily on the degree of shelter on your patio. As a rule of thumb, you can use the following guidelines:
Example: For a sheltered, semi-open terrace of 12 m², a heater with a power of approximately 12 x 200 = 2400 Watts is an excellent, energy-efficient choice.
Safety is paramount, and that starts with a reliable power supply. A powerful patio heater requires a stable electrical connection. Check the capacity of the circuit you intend to connect the heater to. A standard circuit is usually 16 amps, which can handle a maximum power of 3680 watts (16A x 230V). For models above 2500 watts, it is strongly recommended to use a separate, unattended circuit to prevent overload. Always use a grounded outlet and ensure your meter box is equipped with a functioning residual current device (RCD). This is essential for installing a patio heater safely and responsibly.
Now that you've chosen the perfect location, you face an important decision: will you install the patio heater yourself or hire a professional? This decision revolves around a balance between cost, convenience, and, above all, safety. Proper installation is the foundation for years of worry-free enjoyment of pleasant warmth.
Self-installation may seem attractive due to the cost savings and the flexibility of immediate installation. However, the risks of improper installation should not be underestimated. Mistakes during installation or electrical connections can lead to short circuits, fire hazards, and may void your appliance's warranty. Your safety and that of your family always comes first.
Engaging a certified installer or electrician, on the other hand, offers complete peace of mind. You are assured of a safe, professional installation that meets all standards. Moreover, you retain the full product warranty and receive expert advice. The average cost for a professional installation ranges between €100 and €300, depending on the complexity, such as the potential installation of a new circuit. This is a wise investment in sustainability and safety.
Are you considering doing the installation yourself? Then carefully review this checklist. Installing a patio heater is a realistic option if you can check all the boxes below:
Safety is non-negotiable. In the following situations, hiring a certified electrician is n't a choice, but a requirement:
Finding the right certified professional is an important next step. In addition to local guides, it can be useful to consult broader home and garden platforms. For example, the German online magazine Hausblatt is a resource where you can explore paid company listings to find specialists for various home and garden projects.
Wall mounting is the most popular and often most efficient method for installing your patio heater. It provides a secure, stable location and optimal heat distribution throughout your seating area. Careful installation is essential for both safety and the longevity of your appliance. Follow the steps below carefully for a perfect and reliable result.
With the right tools and a little attention, you can easily do the job yourself. This step-by-step plan will guide you through the process:
A safe power supply is just as important as the installation itself. Route the power cord so it doesn't get pinched, doesn't rub against sharp edges, and doesn't pose a tripping hazard. Only connect the plug to a grounded, weatherproof outlet with at least an IP44 rating. Never a standard indoor extension cord. Always choose a splash-proof extension cord specifically approved for outdoor use.
Before you start enjoying it to the fullest, a short test is essential. Switch on the patio heater for the first time and check that the heating element heats up evenly. Test all heat settings and check the operation of any remote control. For maximum comfort and energy-efficient use, you can further optimize operation with smart thermostats. These allow you to easily set schedules and operate the heater remotely, ensuring your patio is always pleasantly warm whenever you want.
A patio heater offers comfort and ambiance, but proper and safe installation is the absolute foundation for carefree enjoyment. At Warmteshop, we understand this better than anyone. That's why we offer more than just high-quality infrared heaters; we provide a complete solution that prioritizes your safety and comfort. Our service doesn't stop with the purchase, but continues until your patio is perfectly and sustainably heated.
Choosing a professional installation is an investment in peace of mind. Our network of experienced and certified installers knows the specific requirements for safely installing patio heaters. They not only advise you on the most efficient positioning for optimal heat distribution, but also ensure a correct electrical connection and a sturdy, weather-resistant mounting. This guarantees you maximum performance and an installation that meets all safety standards. Furthermore, you receive a warranty on both the product and the work performed.
We've made the process as simple and transparent as possible, so you know exactly what to expect. Our specialists will guide you from start to finish, with the goal of achieving a perfect result.
Why take risks or wait unnecessarily? By leaving the installation of your patio heater to the experts at Warmteshop, you'll enjoy the pleasant, healthy radiant heat on your patio faster, safer, and longer. Choose certainty and comfort and extend the seasons in your own outdoor space.
Contact Warmteshop for professional installation advice.
Correctly installing your patio heater is the key to countless cozy evenings outdoors. As you've read in this guide, thorough preparation is crucial: from determining the perfect location and height to the crucial decision between installing it yourself and hiring an expert. A well-thought-out installation not only guarantees optimal heat distribution but also your safety and that of your family.
Would you like to leave the installation of your patio heater to a specialist with complete peace of mind? Then trust the expertise of Warmteshop. With over 18 years of experience and a team of certified professionals, we guarantee skilled and safe installation perfectly tailored to your situation. We ensure that you can immediately enjoy an efficient and stylish heat source, without any hassle.
Are you ready to transform your patio into your favorite spot, no matter the season? Request your free quote for a patio heater including installation here. Feel free to visit one of our more than 30 stores in the Benelux for personalized advice. We're happy to help you enjoy endless, warm evenings.
The ideal mounting height for a patio heater is usually between 2.10 and 2.50 meters. This height ensures optimal and comfortable heat distribution without the heat becoming too intense. Always consult the manual for your specific model, as the power output and beam angle affect the precise height. Proper installation not only guarantees your safety but also the most efficient and pleasant heating experience on your patio.
Yes, many modern electric patio heaters are designed to withstand the elements. Pay attention to the IP rating (Ingress Protection). For example, a model with an IP65 rating is completely dustproof and protected against water jets, making it safe to leave outdoors, even during a downpour. Always check the specifications of your device to ensure its water resistance and ensure long-term, safe operation.
For high-output patio heaters, often over 2,200 watts, a dedicated circuit is strongly recommended. This prevents overloading your existing electrical circuit, especially if other appliances are already connected to the same circuit. This isn't always necessary for lower-output models. However, for safe and reliable installation, we recommend consulting a certified electrician if in doubt.
Power consumption directly depends on the patio heater's wattage (in watts). A 2,000-watt model consumes 2 kilowatt-hours (kWh) per hour. At an average electricity price of, for example, €0.30 per kWh, this would cost you €0.60 per hour. Infrared heaters are very efficient because they directly heat people and objects, so no energy is wasted heating the outside air.
Yes, installing a patio heater under a canopy or awning is possible, but safety is paramount. It's crucial to maintain the minimum distance from flammable materials, as prescribed in the manual. Generally, maintain a clear space of at least 30 to 50 centimeters above and around the device. This prevents overheating and fire hazards, so you can enjoy the pleasant warmth without worry.
The main difference lies in the heating method. An infrared patio heater directly warms people and objects via radiant heat, which is highly efficient and wind-resistant. A gas heater heats the ambient air, which means a lot of heat is lost in the wind. Infrared is also safer (no open flame), maintenance-free, and often easier to integrate into your design. It offers a more direct and focused heat experience.
For the handy DIY enthusiast, installing a patio heater usually a simple task. Most models come with clear instructions and a mounting bracket for wall or ceiling mounting. The most important thing is to install the bracket safely and securely and connect it correctly to a suitable power point. However, if you have any doubts about the electrical connection, we always recommend seeking professional assistance.


