Installing infrared panels: The complete guide to perfect installation
, by Warmteshop, 20 min read
, by Warmteshop, 20 min read
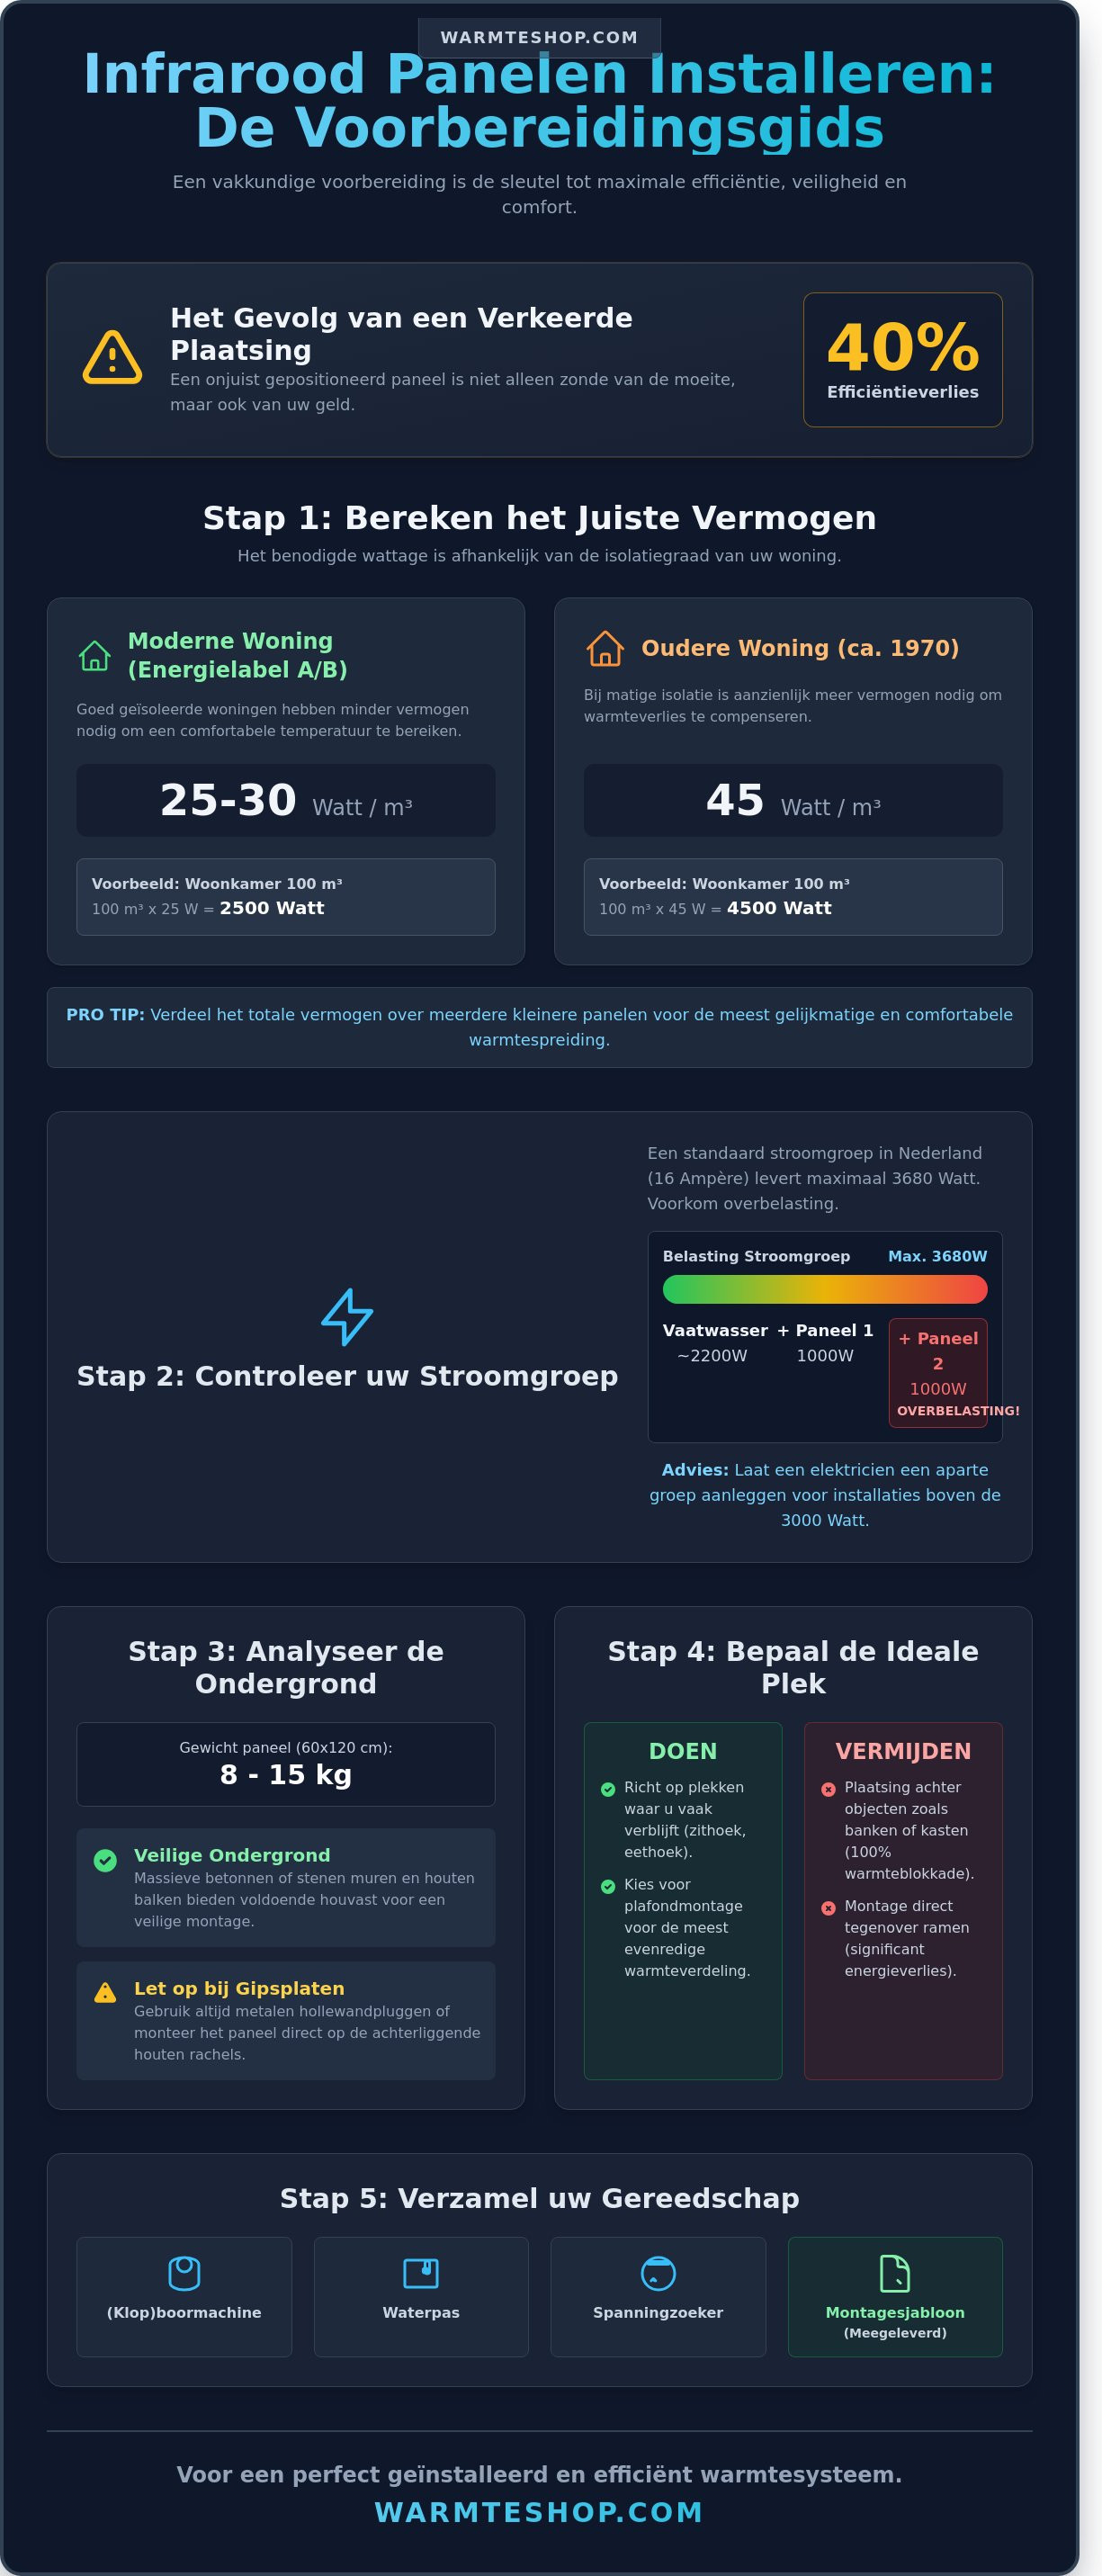
An incorrectly installed panel can lose up to 40% of its heat efficiency even before it is plugged in. Many homeowners nowadays opt for sustainable heating, but they often struggle with d…
An incorrectly installed panel can lose up to 40% of its heat efficiency even before it is plugged in. Many homeowners nowadays opt for sustainable heating, but they often struggle with the fear of unsafe electrical connections or a messy result with visible cables. After all, you want your home to feel as if the sun is shining directly into your living room, without your carefully chosen interior being marred by shoddy technical work or dangling wires.
It is perfectly logical that you strive for a perfect balance between aesthetics and a healthy indoor climate. In this comprehensive guide, you will learn how to confidently install infrared panels for a result that is both safe and extremely efficient for your wallet. We promise that after reading, you will know exactly how to determine the ideal spot for maximum radiant heat and how to actually achieve that coveted lower energy bill. From the first drill hole to connection with a smart thermostat control, we guide you step by step to a neatly mounted panel and a wonderfully warm, future-proof home.
A successful transition to sustainable heating begins with thorough preparation before you actually install infrared panels. Infrared technology works fundamentally differently from traditional convection heaters. Where an old radiator heats the air, a panel directs heat waves to objects and people. To understand this process, it is useful to know: What is an infrared panel? At its core, it is an efficient source of radiant heat that only functions optimally if the environment is designed accordingly. Incorrect placement or underestimating the required capacity leads directly to higher energy consumption and a lack of comfort.
The first step is calculating the required wattage. For a modern home with energy label A or B, you should calculate with an average of 25 to 30 Watts per cubic meter. In an older home from 1970 with moderate insulation, this requirement quickly rises to 45 Watts per m³. A living room of 40 square meters with a ceiling height of 2.5 meters therefore requires a total power of at least 2,500 Watts to maintain the base temperature at 20 degrees Celsius. It is better to distribute this power over three smaller panels rather than one large panel for even heat distribution.
Additionally, check your home's electrical capacity. A standard circuit in the Netherlands supplies a maximum of 16 amperes, which amounts to 3680 watts. If you already have a dishwasher and an oven running on the same circuit in a kitchen, adding two panels of 1000 watts each could cause the fuse to blow. For larger installations, it is advisable to have a separate circuit installed by an electrician to prevent overloading.
The substrate determines the safety of the installation. An average infrared panel measuring 60 by 120 centimeters weighs between 8 and 15 kilograms. A solid concrete wall or a wooden beam provides sufficient support, but with 12.5-millimeter-thick plasterboard, you must always use metal hollow wall anchors or mount the panel directly onto the underlying battens. By checking these technical details in advance, installing infrared panels a safe and sustainable investment in your living comfort.
The effect of infrared is best compared to the natural warmth of the sun. You feel the radiation directly on your skin, provided there are no obstacles in the way. Never place a panel behind a sofa or a cupboard; this blocks 100% of the useful heat. Direct the panel towards areas where you spend extended periods, such as the dining area or the seating area. Avoid mounting directly opposite windows. Glass hardly reflects long-wave infrared radiation, causing a significant portion of the energy to escape directly outside.
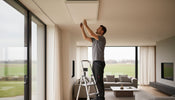
For installation, you need basic equipment that guarantees precision. Use an impact drill for stone or a cordless drill for wood and plaster. A spirit level is indispensable to prevent the panel from hanging crookedly, which would disrupt the aesthetics of your interior. Warmteshop supplies a cardboard mounting template with every panel. Use this template to mark the drill holes with millimeter accuracy. Also, ensure you have a voltage tester to verify that you are not drilling into existing electrical wiring. Choosing the right plugs, specifically tailored to your wall type, guarantees that the system remains securely in place for years.
The physical process of installing infrared panels begins with extremely careful surface preparation. Correct mounting determines not only the visual result but also the ultimate effectiveness of the heat radiation in your home. Always start the job with the mounting template that comes standard with every panel. This paper tool is crucial to prevent measurement errors. A deviation of just 3 millimeters can already cause the panel not to slide smoothly into the brackets. Tape the template to the desired location with painter's tape and accurately mark the drill holes with a pencil.
Once the markings are on the wall or ceiling, drill the holes using a drill suitable for your wall type. For a solid stone wall, use 8mm plugs for robust anchoring. Infrared panels weigh between 4 and 12 kilograms; therefore, secure mounting is essential for long-term safety. Screw the mounting brackets hand-tight to the wall and use a spirit level to check for perfect alignment. Scientific data on the efficiency of radiant heating show that optimal positioning significantly improves the effective heat experience compared to traditional convection systems.
Now carefully hang the panel in the brackets. Most systems use a smart sliding or clicking mechanism. Check the locking by applying light pressure to the panel. It should no longer be able to slide. After the physical mounting, the connection to the power grid follows. You have the choice here between a direct connection to a junction box or simply using a grounded socket.
Safety is paramount in the electrical integration of your new heating system. A direct connection to an existing light fixture offers the sleekest finish as no cords remain visible. Do you opt for a plug connection instead? Then use decorative 15 x 15 millimeter cable ducts to subtly conceal the wiring along the skirting boards. Ensure the thermostat is mounted at a height of exactly 1.50 meters, away from drafts, for reliable temperature measurement.
In damp rooms, stricter regulations apply to the installation of infrared panels. The equipment here must meet at least the IP44 standard, which guarantees that the panel is splash-proof. Maintain a minimum distance of 60 centimeters from the shower or bath, which is known in electrical engineering as zone 2. An aesthetic and functional choice for this room is an infrared mirror. This heats the bathroom efficiently while simultaneously preventing annoying condensation after a hot shower. For a complete sense of luxury, you can combine this system with a towel radiator, ensuring you always have a dry and warm towel. Would you like to know exactly what power your specific room requires? Then request a no-obligation calculation from the experts at Warmteshop for tailored advice.
The location of your heating source largely determines the efficiency and ultimate comfort in your home. When installing infrared panels, the key question often revolves around position: do you choose the invisible power of the ceiling or the targeted heat of the wall? Both options utilize the unique properties of radiant heat, where objects and people are heated directly rather than the air. This process mimics the natural operation of the sun, resulting in a healthier indoor climate without bothersome air circulation.
Ceiling mounting offers superior heat distribution in larger living spaces. When a panel is mounted at a height of 2.5 to 3 meters, the radiation reaches a wide surface of the floor. This floor absorbs the energy and acts as a thermal buffer. This creates an effect comparable to underfloor heating, where the temperature at floor level is often 2 degrees Celsius higher than with traditional convectors. For optimal operation, an unobstructed radiation angle is essential; furniture must not block the path of the infrared rays.
Wall mounting, on the other hand, is the preferred method for specific zone heating. Consider the seating area or a workspace where you want to immediately feel the benefits of the radiant heat. A wall-mounted panel radiates heat horizontally into the room, providing a quicker sensation of comfort at sitting height. During installation, it is crucial to the fire department's safety tips by maintaining a minimum distance of 90 centimeters from flammable objects such as curtains or wooden furniture. This ensures a worry-free transition to this sustainable form of heating.
Ceiling mounting is the most efficient solution for open-plan spaces, such as the living room or kitchen. It prevents cold feet because the radiant heats the floor directly to a comfortable temperature. Additionally, it is an aesthetically pleasing choice; the panels are barely noticeable against a white ceiling and do not take up valuable wall space. From a safety perspective, this is the best option, as the system remains out of reach of children and pets. This minimizes the risk of accidental contact with the hot surface, which can reach temperatures of up to 110 degrees Celsius.
The final decision depends on your specific living situation and the insulation value of the room. In a moderately insulated home, wall mounting often performs better for local comfort, while an energy-efficient new-build home benefits maximally from even distribution via the ceiling. By choosing a strategic position, you not only increase your living comfort but also reduce energy consumption by an average of 20% compared to electric convectors.
An infrared panel is a technical marvel, but the real magic only happens through intelligent control. Without an accurate thermostat, your system operates like an engine without a steering wheel. Because infrared radiation heats objects and people directly, the perceived temperature reacts faster than with traditional convection heating. A good thermostat understands this rhythm and prevents unnecessary energy consumption once the desired temperature has been reached. Practical figures show that precise control saves approximately 6 to 7 percent per degree Celsius on your annual energy bill.
The placement of the thermostat is crucial for optimal results. If you decide to the installation of infrared panels , mount the sensor on an interior wall at a height of approximately 1.5 meters. Avoid locations in the panel's direct radiation beam, as otherwise the sensor will provide a distorted, inflated reading of the room temperature. Locations next to a door or window are also unsuitable; drafts cause false readings, forcing the panel to work unnecessarily hard. A stable measurement location guarantees that constant, healthy warmth comparable to the natural power of the sun.
Automation takes your living comfort to a higher level. By connecting your heating to a smart home system, you can easily control each panel via your smartphone. You set schedules that seamlessly align with your daily routine. Imagine a bathroom that is exactly 22 degrees at 7:00 AM, while the temperature automatically drops to 15 degrees as soon as you leave for work. The process of installing infrared panels truly ends with the configuration of this smart software, which ensures you never heat an empty room again.
The choice between a wireless RF thermostat and a wired Wi-Fi model depends on your living situation. RF models are ideal for renovations because no drilling or breaking work is required. For those who want full control via an app, our Wi-Fi models offer extensive statistics on your consumption. Discover our complete collection of thermostats for every specific room. For smaller rooms or temporary solutions, plug-in thermostats are an excellent choice; you simply plug them into the socket for instant, reliable control.
Infrared technology excels in zone heating, allowing you to create a unique climate in each room. Unlike central heating, which heats the entire house, with infrared you only switch on the panels in the active living areas. This can reduce operating costs by up to 30 percent compared to gas-fired systems. The integration of motion sensors goes even further; the heating switches off automatically when no activity is detected in a room for 15 minutes. This makes your home not only more comfortable but also ready for a carbon-neutral future.
Do you want to know exactly which control system best suits your specific living situation and panels? View our smart thermostats and control modules for optimal system efficiency.
The choice between rolling up your sleeves and hiring a professional is a crucial step in your transition to sustainable heating. While it may seem tempting to save on installation costs, experience shows that professional installation often pays for itself faster than you think. With DIY, you immediately save on a technician's hourly rate, which averages between 50 and 75 euros per hour. However, you often miss out on the tax benefits the government offers for renovation projects.
In Belgium, for homes older than 10 years, you benefit from a reduced VAT rate of 6% on both materials and labor, provided the installation is carried out by a recognized contractor. Are you purchasing the panels separately to install them yourself? Then you pay the standard 21% VAT on the purchase price. In many cases, this difference of 15% on the total investment already covers a significant portion of the installation costs. Moreover, with a Warmteshop expert, you receive a full warranty on the system's operation, whereas with self-installation, you are personally responsible for any damage to the panels or electrical infrastructure during the process.
Another essential aspect is technical precision. Our experts perform complex heat loss calculations that go beyond a simple estimate. We consider the insulation value of your walls, the type of glazing, and the specific airflow in each room. A deviation of just 10% in the calculation of the required power can lead to an uncomfortably cold house or an unnecessarily high energy bill. By the installation of infrared panels leaving
Choosing our installation service means choosing complete peace of mind and an aesthetic result. Our technicians have years of experience concealing cabling, allowing the panels to hang on your wall or ceiling like modern works of art, free from unsightly wires. We optimally configure the entire system, including integration with smart thermostats for the lowest operating costs. For those still unsure about the right choice, our comprehensive guide to infrared heating extensive inspiration and technical background information on the various design possibilities.
Successfully installing infrared panels starts with proper preparation, choosing the right positions, and expert connection to the power grid. We have seen that the correct calculation is the foundation for an energy-efficient result that feels like the natural warmth of the sun. With infrared technology, the transition to gas-free living is not a complicated renovation, but a smart and comfortable upgrade to your living environment. Our showrooms are located throughout the country, ready to let you experience how this healthy radiant heat enhances your daily living comfort. Take the first step today towards a future-proof and energy-efficient home.
Successfully installing infrared panels is the final step towards a future-proof and energy-efficient interior. By finding the right balance between strategic ceiling placement and smart control via a thermostat, you create a climate that feels like the natural warmth of the sun. This allows you to save directly on your monthly energy costs while increasing your living comfort. Warmteshop offers you access to the largest range of design panels on the market, ensuring the technology blends seamlessly with your personal style. With over 30 physical showrooms spread across the Benelux, you always receive personalized advice specifically tailored to your living situation. Our professional installation service takes all the work off your hands and offers a comprehensive warranty on the entire installation. It is a safe choice for anyone seeking a healthy, CO2-neutral way of heating without technical hassle. Make the switch to this innovative technology and experience how simple a warm home can be.
Discover our infrared panels and plan your installation
Yes, you can install infrared panels yourself using the included mounting brackets and a standard drill. The process takes an average of 15 to 20 minutes per panel and requires only basic knowledge of drilling and plugging. For invisible integration into the meter cabinet, we recommend consulting a certified electrician for projects with more than 3 panels.
For maximum efficiency, preferably install the panel on the ceiling, centrally in the room. From a height of 2.5 to 3 meters, the radiant heat spreads evenly across the floor and furniture, similar to the natural warmth of the sun. Avoid corners or areas behind curtains; this obstructs the 160-degree radiation angle and increases energy consumption by at least 10%.
Yes, you can safely mount an infrared panel directly onto a wooden ceiling thanks to the high-quality insulation on the back. The temperature on the back of our panels never rises above 40 degrees Celsius, while the front reaches 110 degrees for optimal radiation. This temperature difference prevents discoloration of the wood, provided you use the standard brackets that allow for the necessary 2 centimeters of air circulation.
Maintain a minimum distance of 20 centimeters between the panel and your furniture or other objects. If an object is placed too close, it absorbs 100% of the direct radiation, causing the rest of the room to heat up insufficiently. By respecting this clearance zone, healthy radiant heat reaches the entire surface of the room, and you enjoy a constant indoor climate without cold spots.
You only need a separate circuit if the total power of the panels exceeds the 3600 Watt limit. A standard circuit provides 16 Amperes, which is more than sufficient for approximately 5 panels of 700 Watts each. When making a complete transition to electric heating for an entire home, it is wise to have 1 or 2 extra circuits installed for safe power distribution.
It is technically possible to connect a panel directly to a power outlet, but this is detrimental to your energy efficiency. Without a thermostat, the panel continues to radiate at full power, which can increase your energy costs by 25% to 30%. A digital thermostat regulates the temperature with an accuracy of up to 0.5 degrees and only switches on the technology when it is truly necessary for your living comfort.
For wall mounting, the ideal height is between 1.50 and 1.70 meters from the floor, measured to the center of the panel. At this height, you experience the radiant heat directly on your body, which immediately enhances the sense of comfort in the seating area or home office. When installing infrared panels, ensure that the panel does not hang too low; otherwise, furniture such as a sideboard can block the efficient heat distribution.
You can conceal the cables most aesthetically by using slim 15-millimeter surface-mounted cable ducts or by routing the wiring directly into the wall. For ceiling mounting, many customers choose to connect the cable via the junction box, ensuring that not a single cord remains visible. This creates a sleek design that perfectly complements a modern, carbon-neutral home without unsightly technical elements.


